Using Reagent to retrieve Stripe.com tokens
Introduction
Stripe.com is an API for payment processing. It is a simple and secure method for handling payments. The beauty of stripe is that you never have to actually handle credit card numbers or detailed customer information, Stripe can do this all for you.
Stripe provides a web API for payment processing, a dashboard for managing your account and javascript libraries for handling the UI of payment method processing. Not only do you never need to actually see a credit card number, Stripe provides elegant UI components for handling common input errors such as the case where the customer mistypes their credit card number (i.e. it fails the Luhn check), incorrect dates and blank fields.
Basic description of Stripe’s workflow:
- Web UI / App UI (Stripe provided) obtains customer payment method using your stripe public key
- Customer Information is sent to Stripe server
- token is returned by stripe
- Your server processes the token using your stripe secret key
This blog post is focused on parts 1-3 using ClojureScript. Token processing is beyond the scope of this post.
React Stripe Elements
React.js has been widely embraced by the ClojureScript community with several ClojureScript implementations. At InSilica.co, we use reagent as the backbone of our UI to our sysrev.us application. Because we use react, making use of the Stripe-provided React components made a lot sense for handling payment processing.
The first step to utilizing these components was to create a package for them in ClojureScript. This was made available to our build servers by creating a react-stripe-elements jar for cljsjs.
Implementing the Components in Reagent
Stripe provides an example Javascript implementation on jsfiddle of their React elements. This was used as a basis for the ClojureScript implementation.
The first step is to adapt the native Javascript React components for use in Reagent. Reagent provides a helper fn called adapt-react-class for just this purpose.
;; Stripe elements
(def Elements (r/adapt-react-class js/ReactStripeElements.Elements))
(def CardCVCElement (r/adapt-react-class js/ReactStripeElements.CardCVCElement))
(def CardElement (r/adapt-react-class js/ReactStripeElements.CardElement))
(def CardExpiryElement (r/adapt-react-class js/ReactStripeElements.CardExpiryElement))
(def CardNumberElement (r/adapt-react-class js/ReactStripeElements.CardNumberElement))
(def PostalCodeElement (r/adapt-react-class js/ReactStripeElements.PostalCodeElement))
(def StripeProvider (r/adapt-react-class js/ReactStripeElements.StripeProvider))
It would be nice if these could just be directly used in order to create a new form. However, there is an extra step of including the .createToken method in props of our form. We can still build up our form using Hiccup, but we will still need to call injectStripe on our form in order to be able to access the .createToken method.
(def element-style {:base {:color "#424770"
                           :letterSpacing "0.025em"
                           :fontFamily "Source Code Pro, Menlo, monospace"
                           "::placeholder" {:color "#aab7c4"}}
                    :invalid {:color "#9e2146"}})

(def StripeForm
  (r/adapt-react-class
   (js/ReactStripeElements.injectStripe
    (r/reactify-component
     (r/create-class {:display-name "stripe-form"
                      :render
                      (fn [this]
                        [:form {:on-submit (fn [e]
                                             (.preventDefault e)
                                             (.then (this.props.stripe.createToken)
                                                    (fn [payload]
                                                      (.log js/console payload))))
                                :class "StripeForm"}
                         [:label "Card Number"
                          [CardNumberElement {:style element-style}]]
                         [:label "Expiration date"
                          [CardExpiryElement {:style element-style}]]
                         [:label "CVC"
                          [CardCVCElement {:style element-style}]]
                         [:label "Postal code"
                          [PostalCodeElement {:style element-style}]]
                         [:button.ui.primary.button "Pay"]])})))))
The index.html file contains the public key (the same used on stripe’s JS fiddle page) , the script tag for the stripe api and a div to host our reagent application:
<!DOCTYPE html>
<html>
    <head>
        <title>reagent-stripe-elements-demo</title>
        <meta http-equiv="Content-Type" content="text/html; charset=utf-8" />
     	<script src="https://js.stripe.com/v3/" type="text/javascript"></script>
        <link href="resources/public/css/main.css" rel="stylesheet" type="text/css">
    </head>
    <body>
        <!-- this key is from https://jsfiddle.net/g9rm5qkt/ -->
        <div style="display: none;" id="stripe-public-key" data-stripe-public-key="pk_test_6pRNASCoBOKtIshFeQd4XMUh"></div>
        <div id="app"></div>
        <script src="resources/public/js/reagent_stripe_elements_demo.min.js" type="text/javascript"></script>
      	<script>reagent_stripe_elements_demo.core.init();</script>
    </body>
</html>
Let’s get the stripe-public-key from the dom:
(def stripe-public-key
  (-> (.getElementById js/document "stripe-public-key")
      (.getAttribute "data-stripe-public-key")))
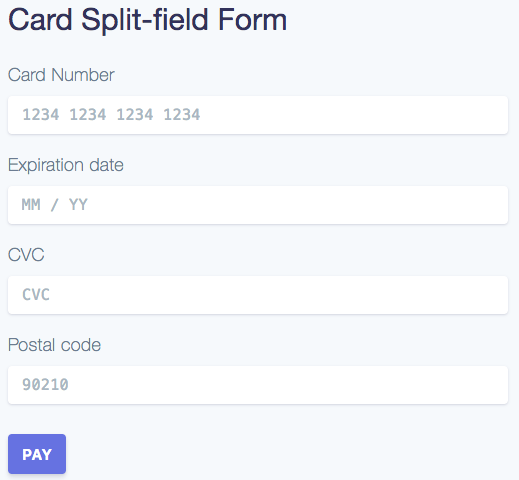
We can now render the form into the dom:
(defn ^:export init
  []
  (r/render [:div [:h2 "Card Split-field Form"]
             [StripeProvider {:apiKey stripe-public-key}
              [Elements [StripeForm]]]]
            (.getElementById js/document "app")))
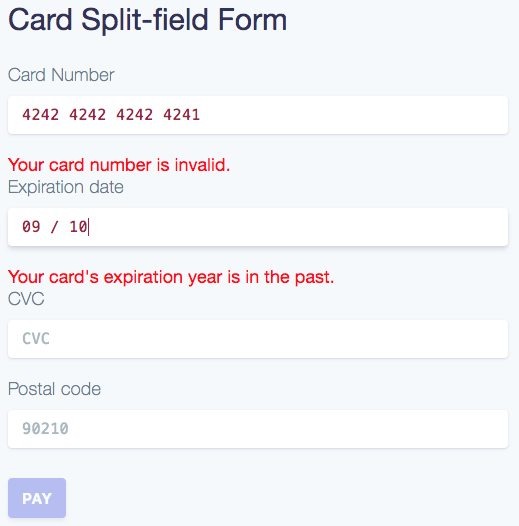
Now that we have the form working, let’s do some basic error handling. In the case where a customer inputs incorrect or blank items, these should be caught before sending the request to stripe’s server. The errors can be displayed in the form so that the customer has an oppurtunity to make corrections
(def StripeForm
  (r/adapt-react-class
   (js/ReactStripeElements.injectStripe
    (r/reactify-component
     (r/create-class {:display-name "stripe-reagent-form"
                      :render
                      (fn [this]
                        (let [element-on-change (fn [e]
                                                  (let [e (js->clj e :keywordize-keys true)
                                                        error (:error e)]
                                                    ;; keeping the error for each element in the state atom
                                                    (swap! (r/state-atom this)
                                                           assoc (keyword (:elementType e))
                                                           error)))
                              errors? (fn []
                                        ;; we're only putting errors in the state-atom,
                                        ;; so this should be true only when there are errors
                                        (not (every? nil? (vals @(r/state-atom this)))))]
                          [:form {:on-submit (fn [e]
                                               (.preventDefault e)
                                               ;; make sure there aren't any errors before submitting
                                               (when-not (errors?)
                                                 (.then (this.props.stripe.createToken)
                                                        (fn [payload]
                                                          (.log js/console payload)))))
                                  :class "StripeForm"}
                           ;; In the case where the form elements themselves catch errors, they are
                           ;; displayed below the input.
                           ;; card number
                           [:label "Card Number"
                            [CardNumberElement {:style element-style
                                                :on-change element-on-change}]]
                           [:div {:style {:color "red"}}
                            @(r/cursor (r/state-atom this) [:cardNumber :message])]
                           ;; expiration date
                           [:label "Expiration date"
                            [CardExpiryElement {:style element-style
                                                :on-change element-on-change}]]
                           [:div {:style {:color "red"}}
                            @(r/cursor (r/state-atom this) [:cardExpiry :message])]
                           ;; cvc number
                           [:label "CVC"
                            [CardCVCElement {:style element-style
                                             :on-change element-on-change}]]
                           [:div {:style {:color "red"}}
                            @(r/cursor (r/state-atom this) [:cardCvc :message])]
                           ;; postal code
                           [:label "Postal code"
                            [PostalCodeElement {:style element-style
                                                :on-change element-on-change}]]
                           [:div {:style {:color "red"}}
                            @(r/cursor (r/state-atom this) [:postalCode :message])]
                           [:button {:style (if (errors?)
                                              {:cursor "default"
                                               :opacity ".45"
                                               :pointer-events "none"})} "Pay"]]))})))))
In this example, the errors are stored in the state-atom of the form that are associated with each element type (for example :cardNumber. If any errors are caught, they are displayed in red under the input they are associated with. The Pay button is disabled if there are errors and the form can not be submitted.
Final Points
After you obtain the token from stripe.js, you will have to process it on your server. This example simply prints the token to the console. During processing, you may have additional errors (stripe provides test card numbers for testing). The code above only catches small errors of input; it does not handle actual payment processing errors. You will need to send the token to your server, check for errors and send back those errors to the client. This is beyond the scope of this post.
The server side processing of payments is beyond the scope of this post, but I would suggest having a look at clj-stripe. Don’t let the age of the code put you off, the Stripe API is quite stable and the library is just a thin wrapper around clj-http. We have successfully used it to process payments.